
Inversions, to keep you centered
This sequence is for beginner to advanced students. There are a lot of options for beginners regarding Sirsasana (head balance) and Salamba Sarvangasana (shoulder balance). If you don’t want to read all the instructions I’ve added, just look at the pictures. They say a lot. Advanced students you can glance over the stages but you can skip through to the full pose, however, beginners, pay close attention to each stage. While all the instructions of how to do are not included, if you have been introduced to the pose in class, the set ups and few instructions will prick your memory.
Inversions are an important staple of Iyengar yoga. A lot of focus is placed on preparing students well for the practice of inversions and we don’t approach it casually. If you are not practicing inversions because of a medical condition or if you are menstruating, there is still a lot of work in this sequence that you can try. Much of the preparation for inversions is safe for all to try. And there are wonderful alternatives to Sirsasana (head balance) and Salamba Sarvangasana (shoulder balance) so even if you are not inverting, there is always something you can do! In place of Sirsasana you can take Dwi Pada Viparita Dandasana with head support (two foot inverted staff pose). In place of Salamba Sarvangasana (supported shoulder balance) you can take Setu Bandha Sarvangasana (bridge pose). Please see the restorative sequence if you are not sure what these poses are, you’ll find them there!
Inversions bring a balance of focus and calm to the mind. Guruji says in Light on Yoga head balance is the king of asana as it ‘makes healthy pure blood flow through the brain cells… .rejuvenates them so that thinking power increases and thoughts become clearer. The asana is a tonic for people whose brains tire quickly.’ Salamba Sarvangasana Guruji calls the mother and one of the greatest boons conferred to humanity as it ‘strives for harmony and happiness of the human system.’ Even if you are not practicing the classical pose, the alternatives will carry the same effect and should be a staple of your practice.
How to approach inversions begins with the standing postures. Geeta Iyengar says that the standing poses make us light and nimble. When the muscles are tight, it restricts movement in the joints. We experience this often as heaviness or congestion. For inversions especially, if the hamstrings and front groins are very tight it makes it hard to kick the leg up. If the shoulders are tight it makes it difficult to balance properly on the head. This sequence gives you some ways to practice to build strength and openness in the upper arms and shoulders. It also prepares the legs so that you do not experience them as lead weight.
Again this is not a full sequence. Feel free to add arm variations
from Tadasana to begin! You can also add in some of the standing poses and
intermix them with the ones I am showing. Trikonasana, Parivrtta Trikonasana, and Parivrtta Ardha Chandrasana, Virabhadrasana III and Prasarita Padottanasana would all be wonderful additions!
A few more notes to consider to more beginner students:
Here is the order of learning inversions for those less familiar:
First: Start with Halasana (plow pose). If you are brand new to inversion, just practice
this to begin. Omit all the ones that follow listed here.
Second: Salamba Sarvangasana. Try raising one leg, Eka Pada Sarvangasana and if
that is coming along you can attempt to raise both legs and balance on the shoulders
Third: Learn Sirsasana after this starts coming along well. When you attempt to start learning Sirsasana, place it sequentially before Sarvangasana
Fourth: Learn the other inversions such as Adho Mukha Vrksasana (full arm balance) and Pinchamayurasana (forearm balance). These can be practice before Sirsasana once
you start attempting them and they will make your Sirsasana feel lighter and more buoyant.
All of the prep work for inversions are a boon for any student and can be tried by all. There are a lot more variations not shown here that are wonderful, so please consider this a small sampling only. If you remember something I’ve omitted, add it in!
Ardha Uttanasana at the wall- (half forward bend) notice the different rotations I am taking with my hands. These variations intensify the stretch of the shoulder region. See the progression:
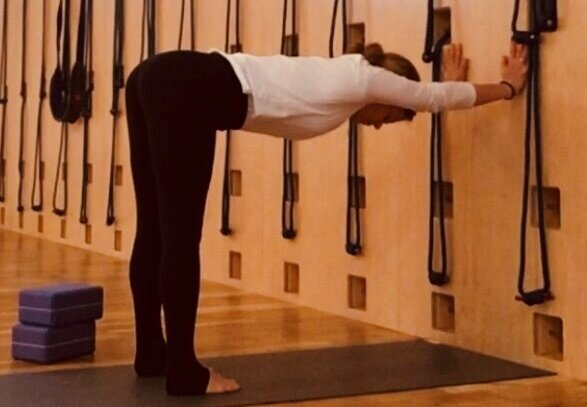

*you can see this one is harder as my armpits and waist shrink a bit.

Ardha Uttanasa on bricks then full pose- This variation challenges the stretch of the hamstrings further and creates space in the armpit chest. Viv, enjoy!


Ardha Uttanasana on a roll (I just heard a collective group groan!)- This variation stretches the calf and further intensifies the stretch of the legs. Start by making a roll between your mat and blanket, make the roll as tight as you can.

Notice how the whole top of my foot is up on the roll, get as much of your foot on the roll as you can but keep the heel in contact with the floor. You can start with the bricks under your shoulders (not shown) and then walk out to intensify. See how the ankle is in deep flexion? This will help with Adho Mukha Svanasana tremendously. Everyone, the is SOOOO good for you!


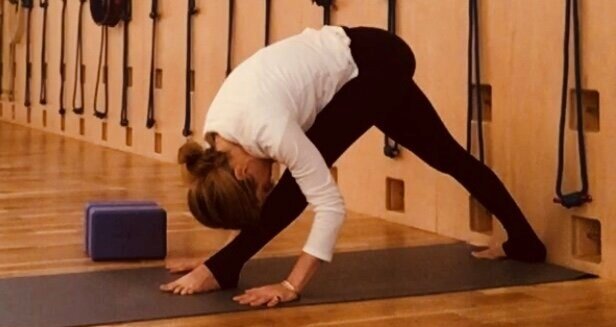
Adho Mukha Svanasana (downward facing dog) start with your hands at the wall to help gain further extension through the arms. This is the first time in this sequence that your arms are really going to feel the weight of the body and it’s nice to have something to launch yourself from! Nancy, that belt on your elbow joint does wonders! Hey Jonah, are you reading this? You need that belt too!

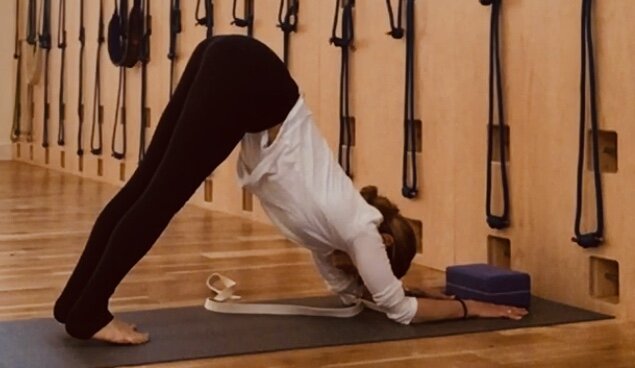
What follows are a series of variations in Adho Mukha Svanasana that prepare for full arm balance. Even if you are not practicing full arm balance, you will benefit. You can see how the wrist is in greater flexion. If new to these variations, don’t stay long. Between attempts, make your hands into fists and press your fist, knuckles down, into the floor keeping the wrists firm and perpendicular to floor to release any tension from the deep wrist flexion in these variations. Don’t overdo.

*notice the changing hand positions and how they are similar to what you did in Uttanasana, try what you can and keep the arms straight:


In these next two variations, the bricks are pushed together as the hands are close together. The first variation the thumbs touch, next the hands are laced as in Baddanguliyasana:


The next few variations are in preparation for Pinchamayurasana. Even if you are not ready to try this pose, you can do all these variations. Notice how the brick is between the wrists. The wrists should not cave in. KB this is good for you! Marissa, this is also good for you!

Hook the tip of your elbow on a chair (kitchen counter would work too) and then reach the outer hips back until armpits are parallel to the floor.


Parsvottanasana (intense stretch of one side). There are many stages, here are two. Do as many repetitions as you like! Margarita, are you reading this? I hope you are keeping up your practice!

Virabhadrasana I (Warrior 1) Here are two stages of the classic pose (there are more stages not shown!) Tamara, you will like this pose and its variations but maybe a bit less the next pose. . ha. Do it anyway, it’s good for you!


These next two variations help bring more space. By elevating the front foot, you weight the back heel down better. This intensifies the stretch of the back leg calf and also helps bring greater lift to the hips. The second variation, shin to the brick, gives some resistance that allows for you to lift the pelvis even more, intensifying the stretch of the back leg groin.


Urdvha Prasarita Eka Padasana (Upward extended one leg pose). This pose is a big one! If you find your foot sliding down the wall, place the top of your foot on the kitchen counter! No one will care. Joey and Al and Viv, I’m talking to you! The most important thing is to keep both legs straight and to keep the hips level as in Parsvottanasana. Putting your aerial foot on a support helps you to ‘shape’ that leg, allowing you to roll the front thigh in and lift the back inner knee with greater clarity. It’s an invaluable prop! Use it!


In this final stage below, see how my lifted leg hand catches the opposite heel, once steady, I can let my foot leave the wall maintaining the shape. After this pose, you might try adding in Parivrtta Trikonasana (revolved triangle) and Parivrtta Ardha Chandrasana (revolved half moon). You might even add in Trikonasana and Ardha Chandrasana. The options are many! Explore, have fun! Robin and Dorian, beautiful, I know it! Jaime, don’t overwork your hamstring!!

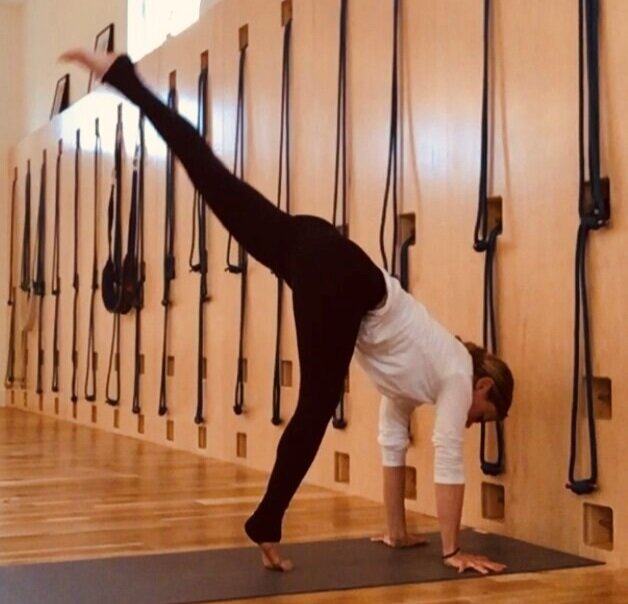
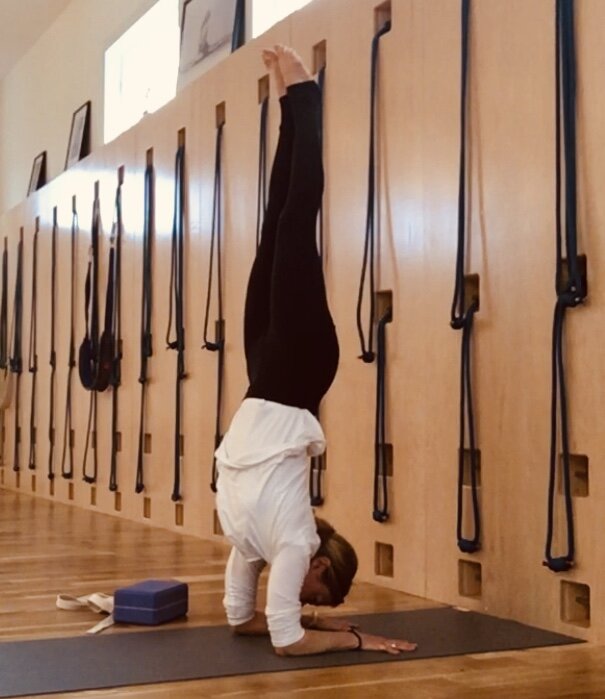
Adho Mukha Vrksasna (Downward facing tree pose) Skip this if you are brand new to inversions! But see how high that leg needs to swing? Well, that’s why you need to practice the last pose more! In place of swinging up you can repeat dog pose with your hands at the wall. For those doing or trying, notice the progression. It is important that you start your attempt to kick up with the shoulders stacked directly above the palms! Notice my palms are turned slightly out, this helps the arms stay straight. You have to squeeze the forearms in and then kick up! Go Holly Go. Barbara, keep it up! Theo I hope you are practicing this one too!


Now balance! You have to see that the fingertips are weighted, the hands have to be working hands and the tailbone has to be in. Natasha, Beth, Becky, Rachel, Paige, Jessica. ..my girls! no excuses! Balance!

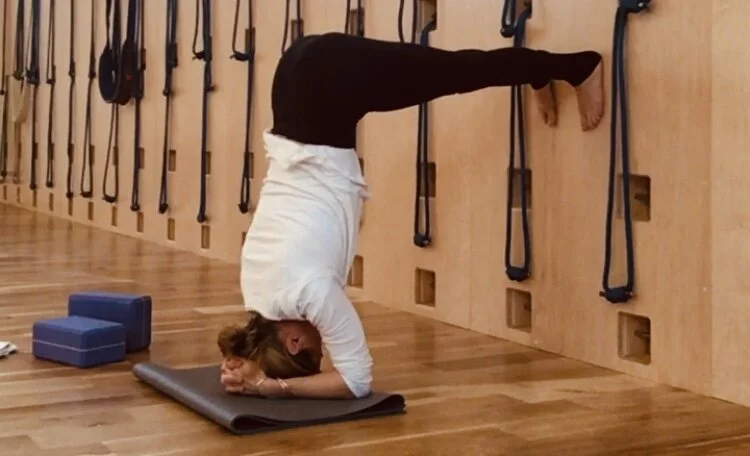
Pinchamayurasana (peacock) If you are new to inversions you can do the first step and skip kicking up. I am using a belt to keep my elbows from flying out. Kelly, you can do this part! The belt should measure the width of the chest from armpit to armpit. A brick between the index fingers will keep your forearms from angling in. Use both until you are proficient in the pose as they will keep the should properly aligned and healthy.

If you still have trouble getting the head not to sink towards the ground, try using a mat roll under the elbows to give your shoulders more lift. Alex, use the roll! Casey, this may be a good option for you too!

Now Balance! Peter, are you reading this? that means you!
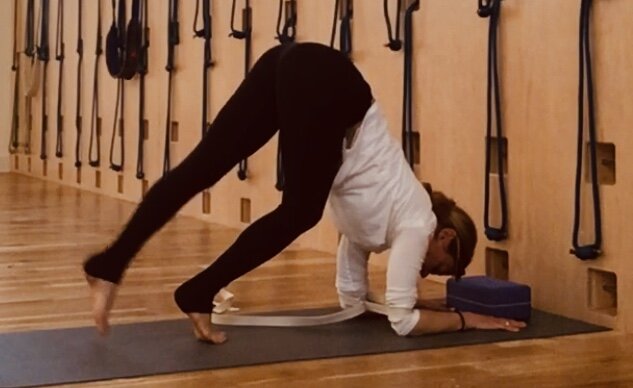
Sirsasana (head balance). There are a lot of approaches one can take. I am going to start out with Ardha Sirsasana (half sirsasana). The first variation shown with the bricks is safe for most anyone to attempt as there is little to no weight on the head. Allison, you can do this first part for now, we’ll work on the rest later! Tell Ben to go in the middle of the room though!

The top brick should hit you between the shoulder-blades and send a message to the upper back to move in. This is important as it creates space in the neck. The forearms have to press and the shoulders lift. Notice my elbows are placed shoulder-width apart.

The next variations do put weight on the head. The intelligence in the upper thoracic has to remain constant. If you are unsure, repeat the last variation and that is enough. Wanting to balance on the head? This variation is a ‘safe’ first experience as the feet stay closer to the floor. I think it is important to have ‘safe’ experiences in inversions as a scary one might set you back from trying again for some time. Here you can walk your feet up the wall. To measure I put my buttock bones on the edge of the mat and stretch my feet to the wall. My elbows are then placed on the edge of the mat.

You just had a brick in your upper thoracic, you have to remember that feeling and press the shoulder-blades onto the back, towards the wall in front of you! And hammer the forearms down to LIFT the shoulders up.

For those able, do the full pose independent away from the wall and add in variations! Eka Pada and Parivrtta Eka Pada would come nicely here. Anja, keep working on finding that stillness in your pose. It’s coming along beautifully so don’t stop practicing it!

After Sirsasana, rest for a bit in child’s pose Adho Mukha Virasana (not shown)
We are moving on to shoulder balance. If you are advanced, you can skip all the detail but you might try out the arm variations I show in Halasana. And advanced students, you should do as much of the Sarvangasana cycle as you can with leg variations here.
Now, beginners: If you find it difficult to swing your legs overhead into Sarvangasana try these preparatory poses. Advanced students, take the full pose!
Urdvha Prasarita Padasana (upward extended legs pose) You can begin at the wall and then try independent:


To challenge yourself, slide away about a foot and slowly lower your heels to the wall on an exhalation. If this is coming along, slide further away and take the legs lower still. Explore! The classic pose for my advanced students is to raise the legs from the floor. Go for it!

From here, you can do spinal rolls. Start with legs bent and if that is coming well, you can do from Paschimottanasana rolling back. You can also pad your mat with a blanket or do these on a rug! They build abdominal strength and are fun. Start with Malasana, holding a counter or kitchen sink edge to get the rounding action the spine will need for these:

Start just by bending the knees to the chest, then roll away!

You can roll with legs bent working your way gradually so that the rolling actions bring your legs over the head. Start with shallow rolls first! After this is coming along, you can try rolling from a full forward bend keeping the legs straight as you roll and stretchin the arms overhead:


Halasana (plow) Here’s what you’ll need. I insist on neatly stacked blankets, got it Austin and Thom!

Sit on the edge of your set up and measure a legs distance from the wall. Carla, are you reading this? Keep up your practice!:

Notice the progression. I start with my legs bent and use my hands to help propel the feet overhead to the wall:

Gwynn and Maggie, I hope you are practicing this!

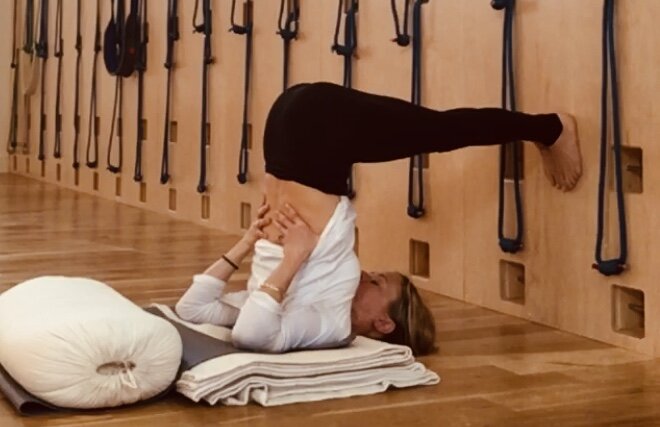
Once the feet are at the wall, I slip a belt on my wrists. When I hit my wrists out against the belt, it helps me to tuck my shoulders under. Then I slip the belt around the elbows:

The following arm variations help you to stand more on the top of your shoulder. By fisting and pushing the elbows down, the thoracic lifts. By taking the forearms down to the side, the outer shoulders descend and tuck under nicely. Andy this is good for you.


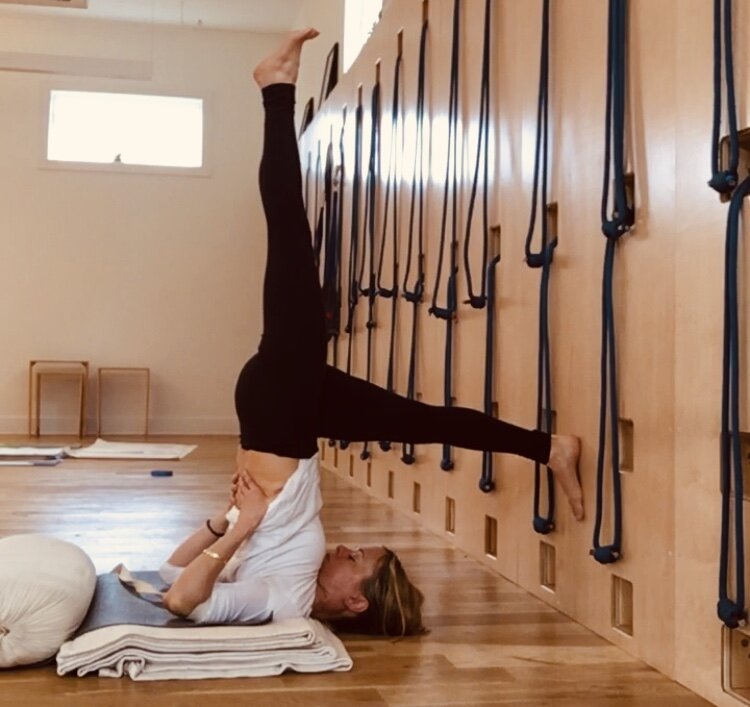
From here try taking one leg up at a time, Eka Pada Sarvangasana. If that is coming and you are stable you can take both legs up to balance (not shown). Al and Lisa, balance!
From here, you can try coming back to plow and then walking your feet down the wall to the floor:


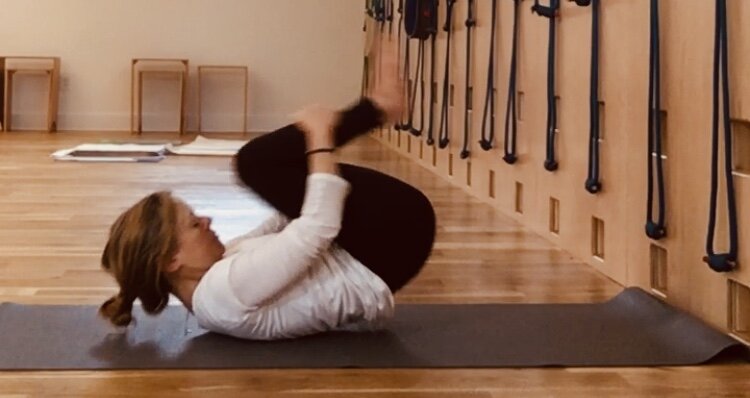
From here, you can also try Karnapidasana (ear pressure pose). See how I let the spine round, like Malasana:

See how I remove my belt and wrap my arms around the back of my knees, this can be very quieting and soothing to the consciousness. Stay for a bit

From here, slowly roll out and rest for a minute.

You can take Savasana next, resting corpse pose, or you could try Paschimottanasana and then take Savasana.. .. or Setu Bandha Sarvangasana. . .I leave it to you as to what you do next.
I hope you all will keep your practice strong and full of inversions. They are a direct north on the compass and will keep you centered on your path.
Aum peace peace peace
Our home practice resources are free and open to the public. If you are enjoying in our sequences and feel inspired to give, you can using the donation link below.

We’ve had students want to help support the studio in this time of closure. Please feel free to add a gratitude donation if you feel compelled. This is not expected, but always appreciated.