A warming abdominal sequence
Hey there, I know, you are stuck inside and it’s probably still raining. It’s okay, inner sunshine ahead!
This is not a complete sequence. It is a suggested start but you may need to ‘fill
it out’ according to your body’s needs. I’ve included a few advanced postures for my intermediate/advanced students. Even if you are not ready to
tackle them yet, it might be nice for you to see where you are headed! Why do
advanced postures? It keeps the mind alert like a beginner mind. It also requires
more concentration and steadfast effort to try something new, two ingredients considered necessary for the yogic journey. When you penetrate deeper inside you also tap a deeper quiet. I suspect it is like diving deeper and deeper into the ocean until you
rest in quiet on the ocean floor. While you might look up to see the ruffles
on the surface, your whole being is absorbed in the quiet down under. So don’t be intimidated by the advanced postures. Keep a curious mind. Dive deeper.
Now some tips for how to practice at home: if you are stiff, do a LOT of repetition. My rule of thumb is that I do enough repetition that I start to feel the stiffness sluff off.
If the stiffness is strong, I just keep repeating until the movements
start to have more freedom. Then I know I’m ready to move on to the next stage of the pose or the next pose. This might mean 4 or 5 repetitions of each stage. Why not!
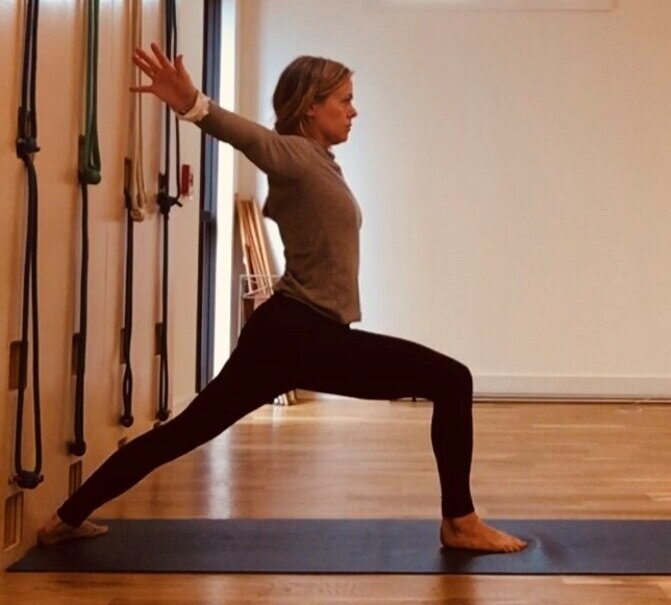
Abdominal poses are warming, stabilizing, strengthening and grounding. You might start with several rounds of Surya Namaskar to begin. Or if you are a beginner, start with the following asana first: Utthita Trikonasana (triangle pose), Virabhadrasana I (warrior 1), Parsvottanasana (intense stretch to one side), and Parivrtta Trikonasana (revolved triangle). All of these poses can be found in the sequence I posted earlier ‘From Triangle to Revolved Triangle’. You can start there and then add as much as you can of this next sequence. If you are an advanced student, consider starting with Sirsasana (head-balance) for 5-10min and Salamba Sarvangasana (supported shoulderstand) for 10-15min. Advanced students can certainly add in more standing poses as suggested for more beginner students. Have fun!
Utktasana (fierce pose) in order to create a feeling of space in the abdomen, roll the buttock bones down and elongate the tailbone. Watch the feeling of lift that comes behind the abdomen with this action. This one small action can be threaded through all these poses!
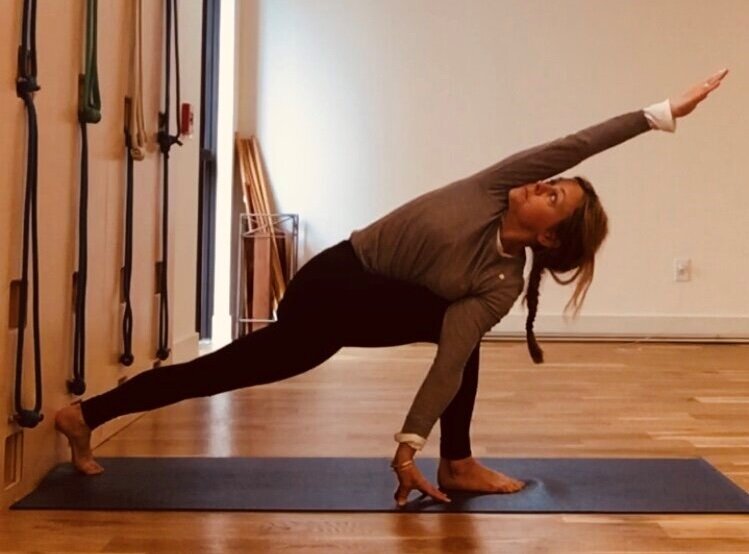
Parsvakonasana (side angle pose).
You can use a brick if you’re stiff or need space in your back. Elizabeth, use a brick for space and lightness!
Parivrtta Parsvakonasana (Revolved Triangle)
This is a big one, I’m putting it in stages for you to tackle. If you are stiff, again use bricks and take height (not shown)
Stage 1- Viminasana- see how the back heel is up. This gives freedom to the hips and will make rotation easier. Keep the pelvis and chest lifted to create length in the lower spine. The abdomen should not fall forward, rather as you lift the pelvis, see that the lower abdomen stretches upward.
Stage 2- use bricks under hands if the hips or spine feel congested, also, repeat this variation several times if the back leg hip is stiff! The outer hips have to grip in here to create stability in the spine.
Stage 3- when you bring your hand to the inside, keep the
bent leg knee and the upper arm close, it’s harder than it seems. The bent leg foot has to remain stable and you have to really grip that outer thigh in.
Stage 4- It’s a big leap to take the arm to the outside. The abdomen must turn well. Especially the lower abdomen below the region of the navel. You want a grip to the outer hips but soften the abdomen and get it to turn. When this comes, taking the arm over will be easier. If you can get over but the hand doesn’t reach the floor, use a brick (not shown)
In the classic pose the heel stays down, all other stages can be repeated. Keeping the back heel down intensifies the stretch to the lower back waist.
Repeating all the previous stages keeping the heel down is wonderful preparation
for forward bendings and deeper twists. Just showing one pic with heel down, but all stages pictured above can be repeated in this way. You can spend a lot of time and repetitions going deeper with this pose. Enjoy!
Dandasana – (staff pose) if the body is stiff, sit on two folded blankets (not shown). Keep the knees firm and pressing down into the floor, this will help generate a lift to the lower spine that is important to feel and observe for this pose and the poses to come.
Paripurna Navasana (full boat pose) Several stages are shown. If the hamstrings are tight, the legs will feel heavy and be hard to lift. Sometimes when this happens the groins will harden. The wall is ideal for this as it supports the weight of the legs. Don’t worry, the pose won’t be easier! It will just be more intelligent :). The legs and torso should have the same qualities as the last pose. The thighs should roll in.
If you can keep the torso lifted, stretch the arms forward. If the spine collapses, it is better to use the hands alongside you.
The full pose is done independent of the wall, but skip this if the legs sink below the height of the head. Use the wall instead.
You can also use a chair for this variation as shown below. The chair lip is a great resource as you can pull on it to help move the thoracic spine in. You can tell I’m loving this. ha. :
You can add in Ardha Navasana (half boat) here if you like (not shown). Robin, go for it!
The base of the next two poses is a combination of Virasana (heroes
pose) and Dandasana. If you have stiff knees, sit on a block and add one (or several) folded blankets, shown below (Diane, take two extra blankets! Sarah and Regine, use a bolster on top of the brick for even more support! Don’t be afraid of more height, be the queen on the throne that you were destined to be!)
Triang Mukhaikapada Paschimottanasana (3 limbed head to knee pose)
Stage 1 If you find getting lift to the spine is hard, sit on a brick. If the body feels like it is toppling towards the straight leg side and that leg is rolling out, place a folded blanket under that side of the buttock until the straight leg can extend straight with toes facing the cieling. I am smiling inside. I promise.
In this next stage, if the spine rounds, use a belt around the foot (not shown):
Final stage. See how my elbows are lifted, use the elbows liftin up and reaching forward to extend the trunk forward:
Here is how to modify using basic props. Here is what you’ll need (you can add an additional blanket for behind the knees as shown above in Virasana). Viv, sit on a chair :). Bebe, stop complaining ;)
The stages of the pose are the same. The roll is for behind the back of the knee to keep it from hyperextending. Use the belt if the chest collapses when you go to catch the foot. Take enough support initially that you can easily stretch your arms up without collapsing the spine. From there all the stages are the same. Just the first stage is shown below:
After Triang Mukhaikapada Paschimottanasana, you might try Janu Sirsasana (not shown), Ardha Baddha Padma Paschimottanasana (not shown), Marichyasna I (not shown) and Paschimottanasana (full stretch of the western side) shown below. These are the four staple forward extensions:
If this pose is coming along, try Krounchasana (the heron).
You will begin from the last pose and go from there. Whatever props you needed for Virasana in the last pose, you’ll need those same supports here. Stages below:
Next stage, stretch the leg straight. If you can’t keep the spine lifted, use a belt around the foot (not shown)
Final stage:
If you want to explore this pose but the legs are heavy, like Paripurna Navasana, you can use the wall and a belt. Brenda and Joey, you can do this! Take whatever Virasana height you need. See below:
Now, if you want to go further, you can move towards Ubhaya
Padangusthasana and Urdvha Mukha Paschimottanasana! Michelle, you do these beautifully. Robin, you to!
Ubhaya means both, start here. If it is difficult to catch the toes, use a belt! Oh look, I am smiling again. . .hahah. Holly and Mary Lou and Barbara, you got this!
Urdvha Mukha Paschimottanasana is an extension from here, the clasp gets stronger and the chest moves closer to the thighs. The balance is on the buttocks.
You can work with a chair to achieve some of these variations, similar as you did in Boat Pose above:
Using the chair behind you can help you get a sense of where the thoracic spine needs to move in:
. .. Now, if you want to go further still, add in an armbalance! Bakasana (the crane) will come nicely after all of this work.
Start out with Adho Mukha Virasana (downward facing hero’s pose). Susan, you can do this and take your knees wider if needed!
Then Malasana (Garland Pose). . hmm I’m concentrating clearly
And now try Bakasana (you can try coming up from the floor,
but if you feel heavy, start on a brick!). Zeph, you got this.
If the wrists pain on deep flexion, put a rolled mat, blanket, or slant
board under the heel of the hand (not shown)
If all of these poses are coming well, your practice has
just begun! Got it Larry, don’t stop here! At the end of your forward extensions and armbalances, add in some twists like Bharadvajasana I and II to release the back
(you can do these twists sitting a chair as well) and Setu Bandha Sarvangasana
(bridge pose) with support. If you are not sure what bridge pose is, you can find an example of how to set up in our Restorative sequence.
Enjoy your practice. I miss you all and I hope you are carving out time to practice at home!
Aum Peace Peace Peace
Our home practice resources are free and available to the public. If you are enjoying in these resources and feel inspired to give you are welcome to through the donation link below.


