A Simple Tool for the Knee…
I remember Geeta saying at a convention that she could not give a set sequence for the knees, she said that it is everyone’s responsibility ‘to get to know their own knee.’ I loved that. It rang true. So much of practice is exploration, listening, and learning. Always many paths to explore. This blog is a short one. It is just a quick reminder/tutorial about how to use a belt for behind the knee for those of you with knee tension/discomfort in some of the bent leg poses. There are SO many ways to work with the hips and knees and this is just one small tool, but it is a useful tool and for many of you it will be familiar. It can be applied to a number of postures where stiffness in the groin/inner thigh has set in and created a pull at the inner knee. Austin, Anja, Larry, and Mary Lou this is good for you and should remind you of how we have worked in class!
I am also offering a simple seated series you can try using the belt. This is NOT a full sequence. If you have pain in the knee, the standing postures can be a great place to start as they are spacious and open. Utthita Hasta Padangusthasana, Utthita Prasva Hasta Padangusthasana and Parivrtta Utthita Hasta Padangusthasana with support are excellent to create freedom in the legs/hips which will ease tension on the knee (look at the blog on Opening into Lotus for ideas for a fuller practice that will address the hips and knees). The Supta Padangusthasana series is also a great place to work.
How to place the belt:
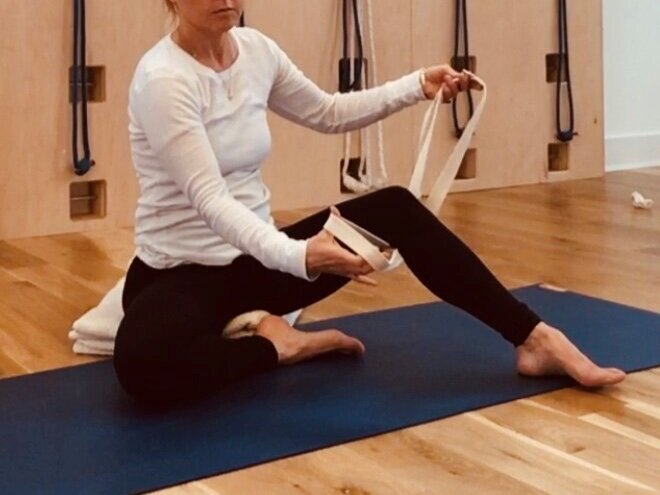
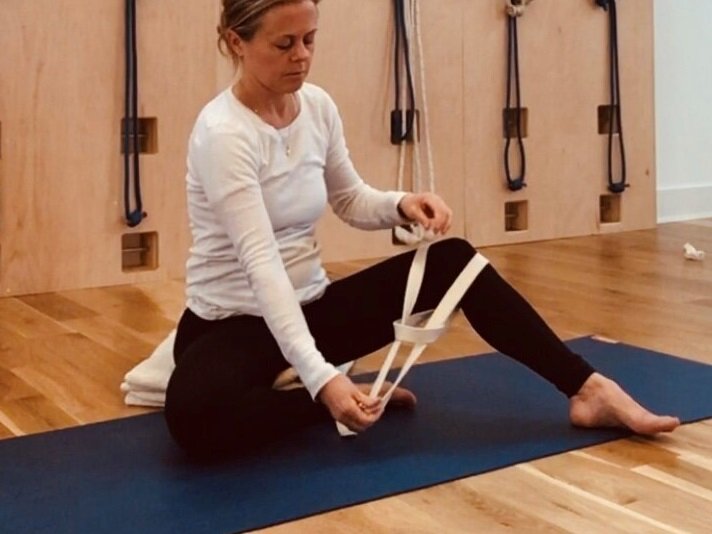
Make a large belt loop. Place the loop behind the knee. I like to place the buckle to the outside to get it out of the way. Then cross the part of the loop on the outside over the front of the knee and thread the end through the other side of the loop and pull taught:
Keep the intersection of the sides of the belt right at the inner knee. Now you have a bit of a spacer and a handle, notice how the belt is helping me to catch the inner knee.
Wide Marichyasana I, using the belt
I begin in Upha Vistha Konasana (not shown) and bend one leg in Marichyasana. Notice however that I am keeping the bent leg both wide and out to the side with the leg oriented in the direction of the wide stance of Upha Vistha Konasana. I bring the heel as close in as I can. I pull up on the belt to create length in the inner leg and turn slightly out (don’t over do or be aggressive with the belt). This position brings length to the inner groin and introduces a deeper flexion to the knee and hip than you will get in most of the standing postures save a few. Here the leg however does not have to bear the weight of the body which allows more lightness and freedom.
From here I keep the one leg in Upha Vistha and take the Marichyasana I leg into Baddha Konasana. The belt helps me to elongate the inner leg and to turn the knee gently out and release the leg further down and out to the side:
Now, once you’ve done the last two variations a few times, try bringing the bent leg into Siddhasana. Notice how I elongate the top of the foot and the inner knee away from each other:
Baddha Konasana with the belt
Once you have tried the bent leg variations with one leg in Upha Vistha, you can try with both legs bent using the belt behind one or both knees:
Siddhasana
You can try this pose in stages. I will show only the first stage, but if the shins/legs are down and there is no pain, you can go for the classic pose and stack the feet:
From here you can explore a wide range of poses. You might try the seated forward bends. If you have active tenderness in the inner knee you have to be cautious trying Padmasana variations as the torque on the knee can be agitating. The poses given above minimize this and are a safer starting point. Most important thing is to work slowly, use discretion, and be a good listener. The body will always tell you what is possible and what is not.
I hope this is helpful and wish you inspired practices.
Aum Peace Peace Peace
If you have found our home practice resource page useful and feel inspired to donate, we are grateful.


